Flashing a CWM ClockworkMod and TWRP custom recovery on your android devices is not difficult, as most of the android users think. It just takes 5 to 10 minutes to complete the task and all you have to run some ADB commands on your windows PC and you are done. Now the Question is Why a custom TWRP or CWM recovery, every android phone comes with the Stock recovery and they allow you to manually flash official updates and clear your phone’s cache. Comes with only limited features, but if you want to install some custom ROM on your phone then you need a custom recovery (Read here how to install custom ROMs on android devices), not only this with the help of custom recovery you can flash rooting file to get root access on your phone or tablet.
Some other features that you can only get with the custom recoveries are like create and remote system backup, Flash custom ROMs, take the full backup of your phone and lots more.

Note: Sometimes you need to unlock the bootloader of your phone to install the custom recovery on your phone. Here’s how to do it on Huawei P8, Micromax YU Yureka, YU Yuphoria, Android one phones, Sony Xperia Phones, Nexus devices, LG G4 and Oneplus one.
Flash CWM or TWRP Custom Recovery on Android
If you have the rooted android phone then install the FLashify App from the Google play store and install the recovery. If you don’t have the rooted phone then follow the below mention steps.
Step 1. Download the latest USB drivers for your phone from here ans install the same on your windows desktop.
Step 2. After this, you need to setup the ADB and Fastboot drivers on your windows to run the basic ADB commands to install recovery. Install the ADB and fastboot file here and run it on your desktop. This will create an ADB folder on your C Drive (C:/ADB). You need to use this folder to flash recovery on your phone.
Step 3. Download the latest version of either CWM or TWRP for your android from the below mention links:-
Download CWM here or Download TWRP here
Step 4. Once the recovery img file is saved on your desktop, rename it to recovery.img and paste in the ADb folder (C:/ADB) that you created in step 2.
Step 5. Now connect your phone to the PC with USB cable and enable the USB debugging mode. To do this Navigate to Settings > About Phone > scroll to the bottom > tap Build number seven (7) times. You’ll get a short pop-up in the lower area of your display saying that you’re now a developer.
Go back and now access the Developer options menu, check ‘USB debugging’ and click OK on the prompt. See the screenshot below:-

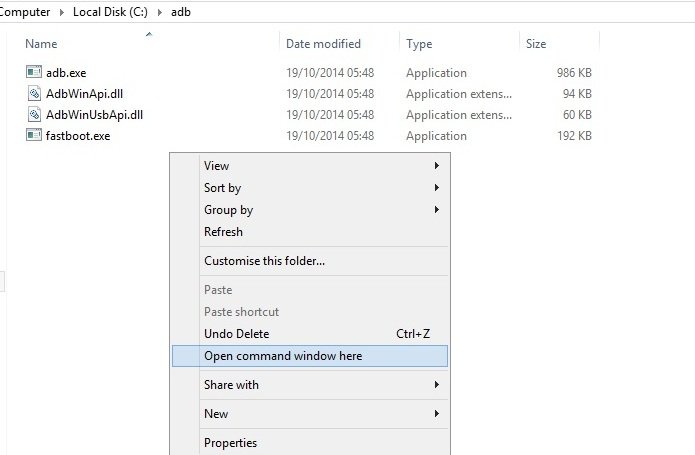
Step 6. Now open the ADB folder (C:/ADB) on your desktop and open a command prompt window here. To do this Hold Shift button on your keyboard and right-click on the empty space of the folder. See the screenshot:-

Step 7. Enter the following commands:-
adb devices
Make sure your device is listed.
Next, type in:
adb reboot bootloader
Wait for the phone to reboot in bootloader mode. See the screenshot below:-

Step 7. Now your phone will boot in fastboot mode. Once the phone in fastboot mode, type the following command to flash the recovery:-
fastboot flash recovery recovery.img
Hit enter, and this will flash the recovery on your phone.
Step 8. Now you have to reboot your phone. Enter the following command and hit enter:-
fastboot reboot
Voila, that’s it! You now have custom recovery flashed on your phone, congrats!

How to download 7.0 version setap for Samsung j210f plzzz gate links.send to my Gmail.
how to get cmd on the left mouse menu
l can’t download CM 14.1 rom, l found it very difficult, please help,