Here is the Complete Guide to Unlock Bootloader, Install Custom Recovery and Root OnePlus One Android smartphone. This guide is thorough and explains each and every step in a noob-proof manner. In this Guide we’ll show you how to do all these thing step by step on your new OnePlus One phone. First you have to unlock the bootloader, then install TWRP recovery and after that Flash the SuperSu zip file to get the root access on your phone. The guide is little bit lengthy, but not so difficult all you have to follow each and every step one by one to complete the process. Once the device is rooted, you can enjoy lots of benefits of rooting like instal custom rom, tweaks, modes etc.
NOTE: Do take the full backup of your phone. Unlocking the bootloader will completely wipe all data from the device. This includes apps, settings and even the contents of the internal sdcard (pictures, music, etc.). Good…lets begin.

1. Unlock Bootloader One Plus one
Make sure that the Proper drivers are installed on your PC to use the fastboot commands, or read our guide here how to install Oneplus USB drivers.
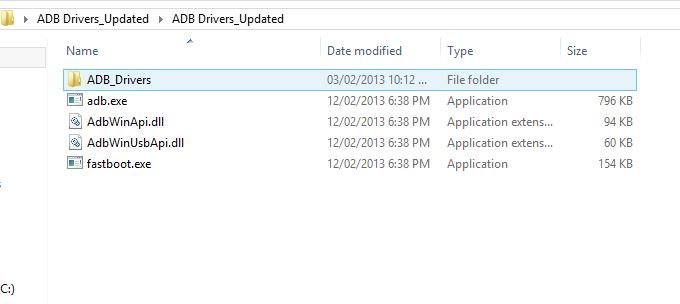
Step 1. Download the ADB and fastboot file here and extract the folder on your desktop.

Step 2. Now turn the phone off. Then boot it into fastboot mode by holding volume up + power. The phone will display “fastboot” text indicating that it has successfully entered fastboot mode.
Step 3. Connect you phone to PC with USB cable.
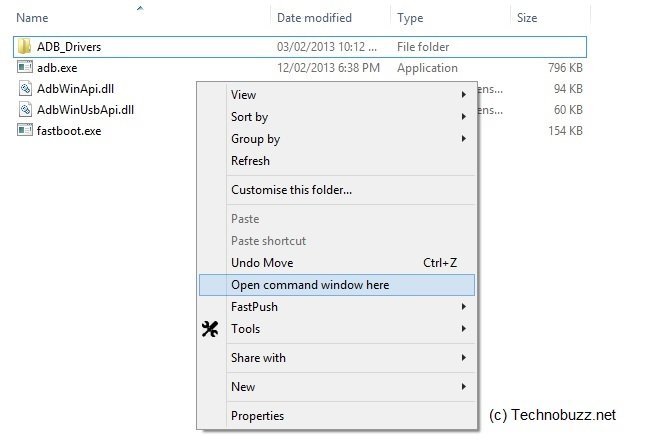
Step 4. Now open a command prompt window on the ADB folder. Hold Shift button and Right click on the White space of the folder and click on “Open Command Window here”.

Step 5. Now enter the following command on the windows:
fastboot devices
This command will list the connected devices. If your phones serial number shows up you are good to go and may continue. If the phone is NOT listed this indicates that your drivers are not installed correctly.
Step 6. After this proceed to unlocking the bootloader with the following command:
fastboot oem unlock
Step 7. After the above command has finished executing, run the following
fastboot reboot
Now the One plus one will and wait for few minute to reboot the device. After that adjust the following settings on the phone:
USB Debugging – On your phone go to Settings > About phone > Tap on Build number 7 times. This will enable Developer options. Now go back to Settings > Developer options > Enable USB debugging
Disable CM Recovery Protection – On your phone go to Settings > Developer options. Then disable the ‘Update recovery with system updates’ option.
Close the command prompt window and proceed onto the next section of the guide.
2. Install TWRP on One Plus One
Step 1. Download the latest TWRP recovery here.
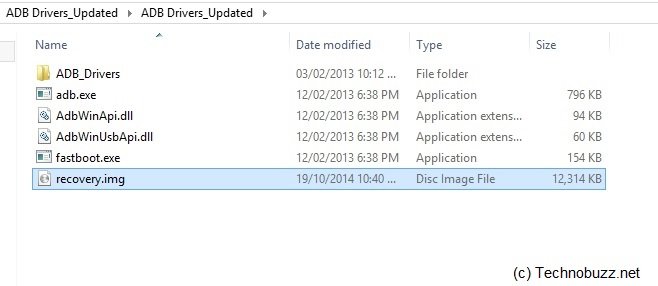
Step 2. Rename the recovery file that you downloaded above to recovery.img and move the img file into the ADB folder that your downloaded and extracted on your desktop.

Step 3. Turn the phone off. Then boot it into fastboot mode by holding volume up + power.
Step 4. Open a new command prompt and run the following commands:
fastboot flash recovery recovery.img
If the coomand will not work, or giving error like can’t find recovery.img then type fastboot flash recovery and press spacebar, then drag the recovery.img into the command window, press enter to flash.
Step 5. Once the flash has completed. Siwtch off your phone by Holding the power button and reboot the phone.
Now the phone will reboot and the TWRP is installed on your phone. Now follow the next step to root your device.
3. Root OnePlus One
Step 1. Download the SuperSu zip file here and copy the file on your phone.
Step 2. Boot your phone in recovery mode. To do this hold volume down + power. Leave the phone at the main screen of the custom recovery for now.
Step 3. Now go to Install > browse to SuperSU zip and select it. Swipe to confirm the installation. Then reboot.
Now the phone is rooted. Congrats! That is all! Your phone now has an unlocked bootloader, a custom recovery installed and is rooted. Enjoy

Thanks for the instructions. My one plus is now rooted with a custom recovery. Easy to follow.