
SABS (Simple Ad-Blocker for Samsung) is a System less ad-blocker for the All the Samsung Galaxy Phones. This will work on any Samsung Galaxy Phone whether is Galaxy 9, Galaxy 8 or any other Galaxy phone running on the Android OS. Samsung Ad-Blocker SABS is one of the best way to block all the popup ads on any Samsung phones. There so many other ways are available to block the Ads on Samsung Android Phone, But most of them need a VPN access and that eats lots of battery of your phone and not good for your phone. So in simple words, we can say that best Samsung ad blocker is SABS (Simple Ad-Blocker for Samsung).
With the help of this application, you can easily block all the ads on your Galaxy android phone like block URLS, domains, disable system apps, remove permissions from apps. The app is tested on most of the Galaxy Phone like Galaxy S8, S8+, Note 8 and Galaxy 9 and it works like a charm and best adblock for your Samsung phones. To install this phone all you need a rooted Galaxy Phone. You can check some our rooted Samsung Guide here. Once you root the phone you can easily install this adblocker on your Android phone.
Before following the below mention guide let me clear some things that this guide is a little bit longer and takes so much of your time. And read all the steps very carefully and follow all of them one by one on your phone. If you are serious and want to block ads on your Samsung phone, then follow this guide. Alos, changes made with SABS are not permanent on your phone. You can any time reverse the system level changes due to Samsung’s KNOX tools.
Warning: Technobuzz.net is not responsible for any damage that might happen to your phone during this process.
How to install SABS Simple Ad-Blocker for Samsung Galaxy
To install the SABS Ad-blocker on your Samsung phone, You need to do 3 things before installation of the SABS.
a) First a working version of SABS.
b) Second, you need a Samsung license key (Knox key).
c) Third, you need to change the package of the copy of SABS to a different one.
So let’s get started and see how this works on Samsung Android Devices.
How to Get Samsung license key (Samsung Enterprise Knox key)
1. Visit this page and Sing in for the Samsung Account.
2. Once the account is created, Click here.
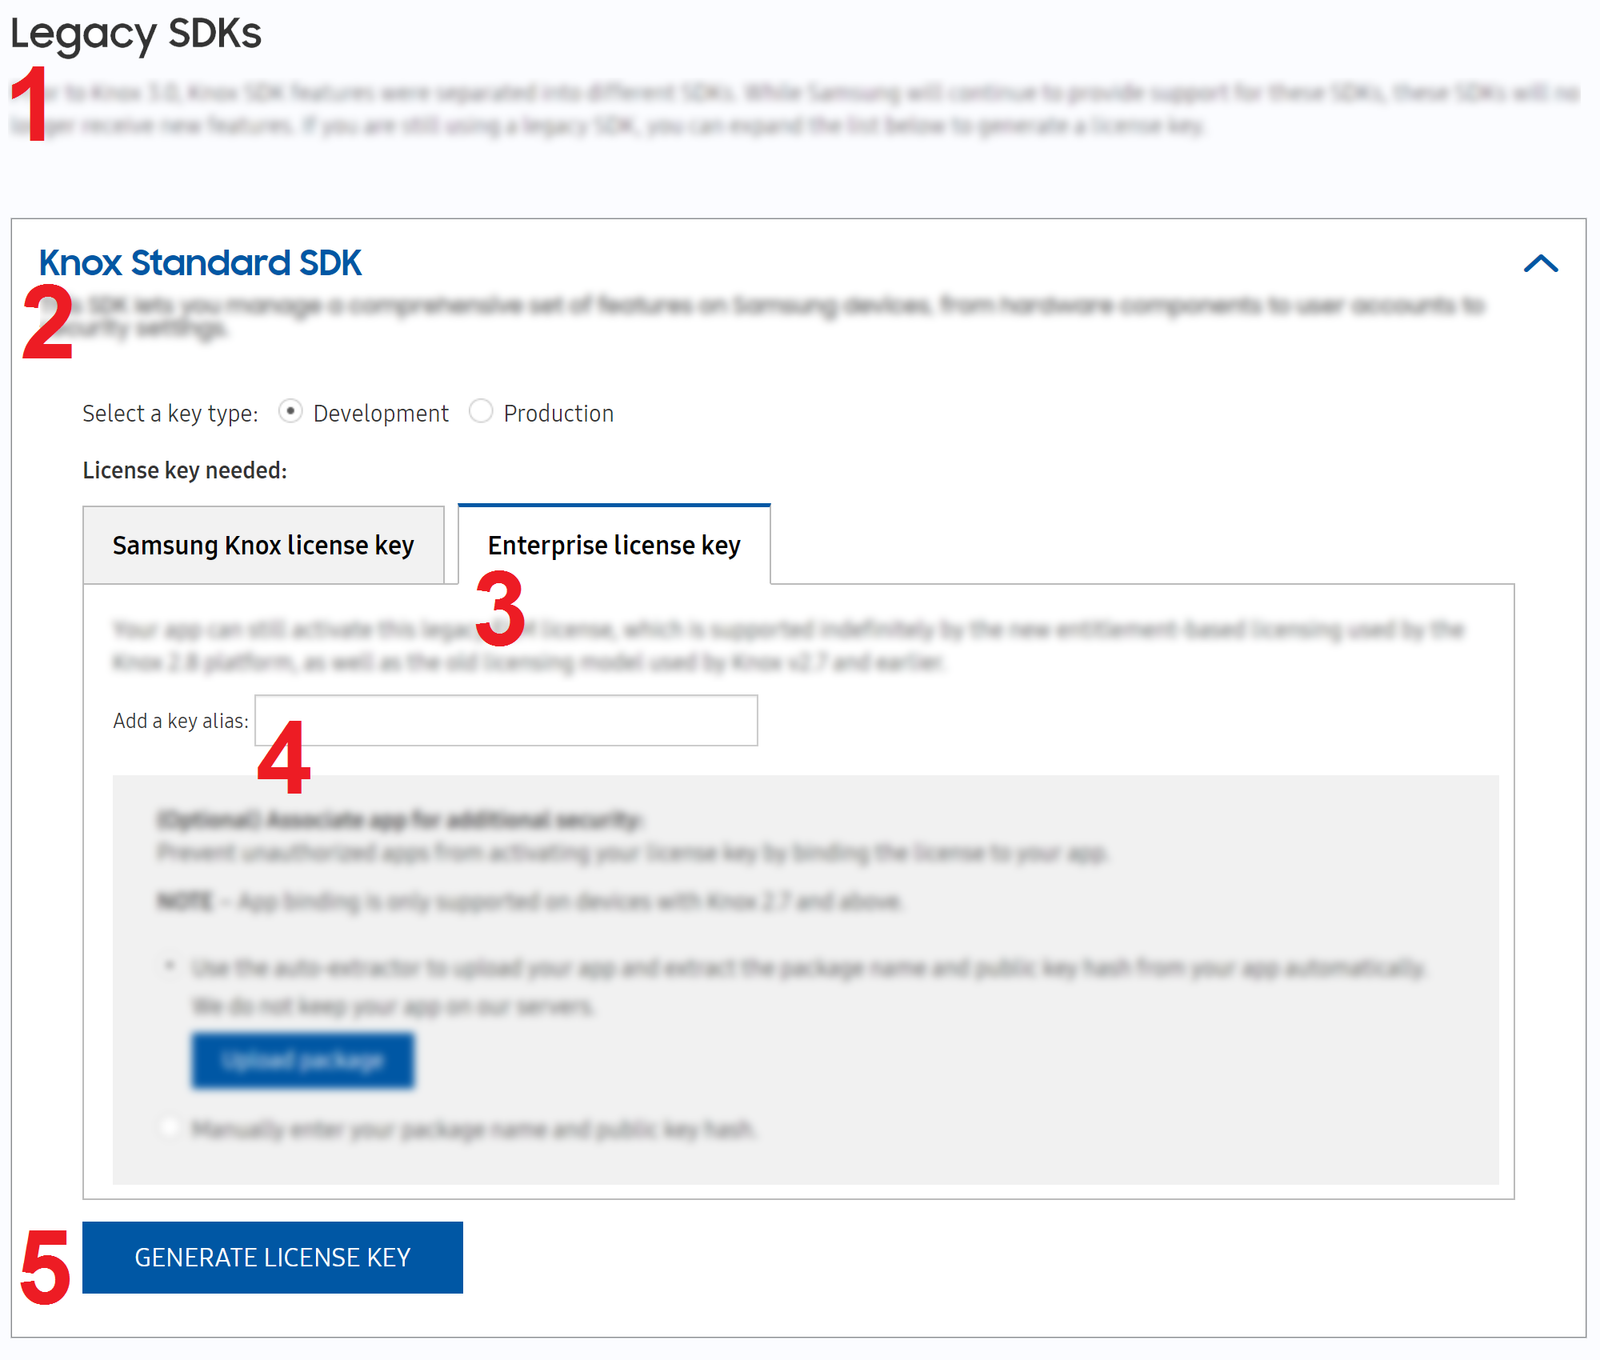
3. Now form this page Go to the Legacy SDKs > Knox Standard SDK > Enterprise license key and Write anything on the Add a Key Alis and Hit the Blue Generate Licence Key. See the Screenshot below for the reference.
4. Copy the key and save it somewhere. If the key starts with “KLM” letter, that means you did something wrong. Complete the above mention steps again.
How to Install Samsung Ad-Blocker SABS with Android Studio
Before starting you need to download the SABS apk and SABS source code.
Download SABS
APK:
- Download SABS original APK
- Download SABS modified APK | changed package name
Source code:
- Download SABS source code | to generate APK
- Download SABS master source code | complete SABS project
You can directly use the latest SABS modified APK from above mention link and see if it works. If it will not work for you, then you will need to download the source code, and open the project in Android Studio, change the package name, and install it. To do that follow the below mention Steps.
1. First, enable the USB debugging mode on your phone. To do this Go to phone Settings > About phone > Software information > tap 10 times on Build Number until a message “You are now a developer!” appears. > Go back to Settings > Developer Options > Turn on USB Debugging Mode.
2. Now connect your phone to the Windows PC with Orginal USB cable.
3. Download the SABS Source code form the above mention link and unzip the folder on your Windows PC desktop.
4. Now download the latest version of Android Studio here.
5. Once the android studio is installed, run the Android Studio exe file on your PC.
6. From here select “Open an existing Android Studio project”. Choose the extracted folder of source code.
7. Install the latest SDK and other files from here. Follow the onscreen instructions on the app and this will take some time to complete the task.
8. Once it is down and the progress bar will be gone at the bottom. From the left tab on screen, open the “Gradle Scripts” and then “Build.Gradle (Module:app)”.
9. Find the line “applicationId “com.layoutxml.sabs”. Usually, it is on the 24th line. Change the “com.layoutxml.sabs” to a random or unique sequence of letters and digits. Keep the sequence length same as before (i.e, 3.9.4).
10. Now you will see an alert on the top of the screen.
11. Now select “Sync Now”. Wait for the project to load.
12. Now in the Android Studio click the Play button or simply press the keys Shift+F10. Select your phone and press OK.
13. Now this will install the SABS APK on your phone.
14. now run the app on your phone and Enable Admin.
15. Enter the Samsung Knox license key in the field, the same key that you created in step 1 from above.
16. Submit Knox key. Activate License. Turn on SABS.
17. Now all the ads are blocked on your Samsung Galaxy Phone.
If you are facing a problem with the Android Studio, then you can change the package name on your phone with the help of APK editor.
Download SABS APK from above. and install the “APK Editor Pro” app from google play store.
Select APK file. Select “Common edit”. Edit only the field “Package name”! as shown here. Change the “com.layoutxml.sabs” to a random or unique sequence of letters and digits. Keep the sequence length same as before (i.e, 3.9.4). Select “Direct rename”, “Rename the package name in resources.arsc”. Do not select any other option in the application and Press the Save button.
After that Press install and install again.
So this is the full guide to block all the ads on the Samsung Galaxy Phone with the help of SABS (Simple Ad-Blocker for Samsung). If you are facing some problem then leave the comment below and we will help you to fix it up.
Hello ?,
I proceeded with all of the instruction but I got the error”Gradle project sync failed. Basic functionality nit working properly.
Please help me