Nexus OTA updatetes directly come from the Google and sometimes it will take such time to reach to the user. So, in that case, most of the user install the updated Full System image manually, which is a long method to update the Nexus phone. But now you can install all the latest Marshmallow or Android N OTA update manually on your phone with a simple ADB command. This new method uses the adb sideload command to flash the latest OTA update on the Nexus Devices. All you need an OTA zip Files, ADB and Fastboot file on your PC. The process is very simple all it take a few minutes to complete the whole, now no need to wait for the OTA update notification on the phone, you can flash them manually.
Here is this tutorial we’ll show you How to Install Nexus OTA Update Manually With ADB Sideload Commands. No need to root your phone or install any custom recovery. So what are we waiting for and let us take a look how to do that in easy and straightforward steps.

Read Also:- Download Android N Developer Preview 3 For Nexus Devices
Install Nexus OTA Update Manually With ADB Sideload
Step 1. Download and Install the latest ADB and Fastboot files here. Run the Exe file on your PC and you will see the new ADB folder on your Windows System Drive (C:/ADB).
Step 2. Now Enable the USB debugging mode on your Nexus phones. To do this Go to Settings > About Phone and Tap the Build number field seven times to enable Developer Options.
Now go back to setting page you will use the New Option called “Developer Options.” To enable USB Debugging, you’ll need to jump into the Developer Options menu, scroll down to the Debugging section, and toggle the “USB Debugging” slider.
Step 3. Download Nexus OTA zip file from the below mention link.
Once the zip file is downloaded, rename it to OTA.zip. And copy the file in the ADB folder that you created in Step 1.
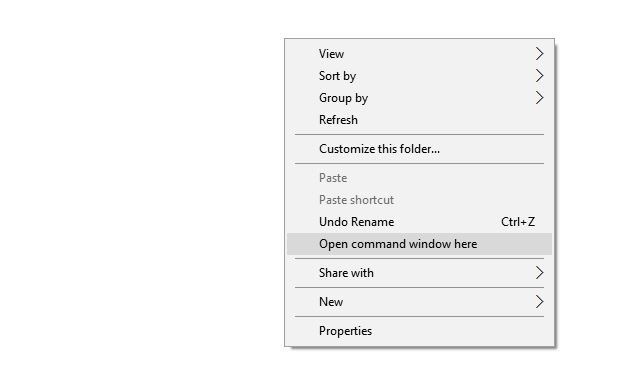
Step 4. Connect your phone to the PC with USB cable and Open the ADB folder. Shift+right click in the folder, making sure that no files are selected first. Select “Open command window here.” And you will see the command window on your desktop screen.

Step 5. In the command window, enter the following command.
adb devices

Now you’ll see an alphanumeric identifier and the word “device.” You’re ready to go.
Step 6. Use this command to reboot the device into recovery:
adb reboot recovery

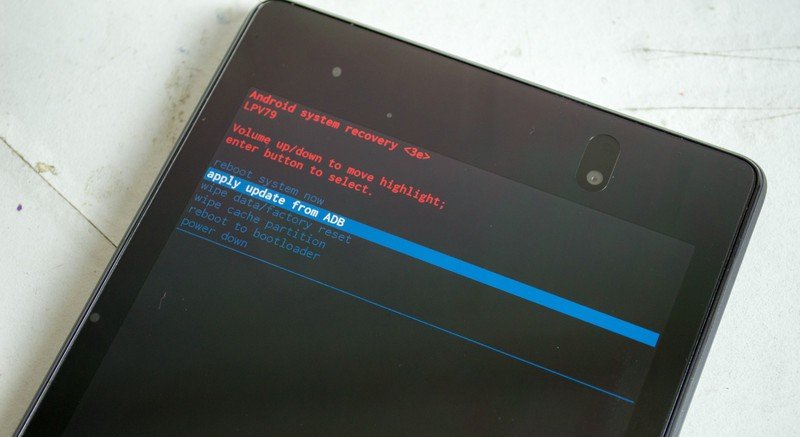
Step 7. Once your phone in recovery mode. Use the volume button to navigate to the “Apply update from ADB” option, then press the Power button.

Step 8. Now go back to the command prompt window and enter the following command to flash the OTA.zip file.
adb sideload OTA.zip

Step 9. Now the flashing process will start on your phone, and this will take some time upon the size of the file.
Step 10. Once finished, the recovery menu will show up again on your phone, with the “Reboot system now” option. Select Reboot.
Now your phone will reboot, and first boot will take some to apply the changes on your Nexus Devices. Enjoy the new OTA update on your phone.,
