Finally, The TWRP recovery is available for the Oneplus 2 Android smartphone, that mean now you can easily root your Oneplus 2 and install custom ROMS also. So here in this guide we’ll show you how to easily flash the TWRP recovery and Root Oneplus 2 Android smartphone. Once the phone is rooted you can enjoy lots of rooted apps on your phone, install custom ROM, take android backup etc. The guide is very simple and takes only a few minutes to complete all the task. First you have to install the TWRP recovery on your phone with the help of ADB commands and after that you have to flash SuperSu zip file via recovery to get the root access on your Oneplus Two.
Make sure to take the full backup of your phone and save it in some safe place. Check out our guide here how to take the full backup of non-rooted android devices. Read all the instructions very carefully and follow all the below mention steps one by one on your Oneplus 2 android smartphone.
If you are the Oneplus 3 user, see this – Steps to Root OnePlus 3 and Install TWRP Recovery

Install TWRP Recovery and Root Oneplus 2
Step 1. To get started you have to install the proper Oneplus 2 USB drivers and ADB files on your PC. Read here how to install Oneplus 2 USB drivers. After setting up the drivers you will see the ADB folder on your PC C drive. (C:/ADB)
Step 2. Now you have to unlock the bootloader of your phone, without unlocking it you can’t install the TWRP on your phone. Check this guide to unlock the bootloader of Oneplus 2.
Step 3. Now enable the USB Debugging mode on your Oneplus two android smartphone.
Step 4. Download the TWRP recovery file
Step 5. Now rename the Oneplus 2 TWRP Recovery.img to recovery.img and place the file in the ADB folder that you create in Step 1.
Step 6. Now download SuperSU root package here and transfer the zip file on your phone.
Step 7. Now boot your Oneplus 2 in Bootloader mode.
Step 8. Connect your OnePlus 2 to PC with USB cable.
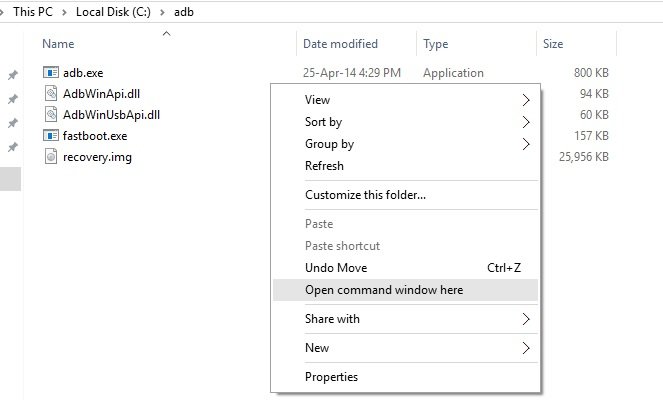
Step 9. Now open the ADB folder that you created in Step 1 and in which you save the recovery.img file. Open the command prompt window in this folder, To do this Hold Shift button on your keyboard and right-click on the empty space of the folder. See the screenshot:-

Step 10. Now a command window opens up on your desktop. Flash TWRP recovery on your OnePlus 2 now. For this, run the following command.
fastboot flash recovery recovery.img
Step 11. When done, boot your OnePlus 2 into TWRP recovery directly by using this command.
fastboot boot recovery.img
Step 12. Now your Oneplus 2 will boot on TWRP recovery. From here tap on the Install button and flash the SuperSu zip file that you saved on your phone in step 6.
Step 13. Once completed, Tap on Reboot System button to restart the OnePlus 2.
That is it. Now the TWRP is installed and your Oneplus 2 is rooted.

hey there. im getting this error.
C:\adb>fastboot flash recovery recovery.img
target reported max download size of 536870912 bytes
sending ‘recovery’ (25956 KB)…
OKAY [ 0.729s]
writing ‘recovery’…
OKAY [ 0.219s]
finished. total time: 0.948s
C:\adb>fastboot boot recovery
cannot load ‘recovery’: No such file or directory
can you help me out?
You’re entering the wrong command… Command is
fastboot boot recovery.img
wait ill try it again
oh. yes it is done. thanks. i was following the thread in the oneplus forums. they got the command wrong there.
Thanks For the help dude.
🙂
Great…. You’re Welcome… Enjoy the phone 🙂
And using Mac? The files couldn’t be the same.. How can I do?
Is this work for all oneplus2 medel: A2001 /A2003/ A2005 ?
Yes
Will i ota updates after rooting my op2?
in step 10 it says failed
remote:image is not a boot image
might help – – – – > https://www.youtube.com/watch?v=DPa6UaZtee0
i get the mess
Error: cannot open *recovery.img*
help?
Hi, When I download the TWRP file.. it’s showing up as an .exe. not an img. Would you know why?
Nevermind! I got it from the mirror link!
Hello!
Does this method wipe the phone?
Thanks!
Can I do this and install the a2003 version?
My objective is to add lte bands that aren’t available on my US purchased OP2.
Thanks!
Only unlocking bootloader will wipe data