If you recently bought the Redmi Note 8 and looking for the guide How to install TWRP on Redmi Note 8 and How to root Redmi Note 8 then you are at the right place. Here in this guide, we will show you how you can do this easily on your Redmi Note 8. To Root or Install TWRP on any android, you have to unlock the bootloader of the phone first. Without unlocking you can’t process. Here is the complete guide to Unlock the Bootloader of the Xiaomi phone. And yes unlocking process will wipe all the data from your phone, so do take the full backup of your phone before following this guide.
Redmi Note 8 is Xiaomi’s latest mid-budget phone which comes with the Qualcomm Snapdragon 665 SoC, 6.39 inches (16.23 cm)1080×2280 px, 395 PPIIPS LCD, 48 + 8 + 2 + 2 MP Quad Primary CamerasDual LED Flash13 MP Front Camera, 4000 mAhFast ChargingUSB Type-C port and Dual SIM Nano support. For connectivity, the smartphone has been provided with 4G VoLTE, Wi-Fi 802.11, b/g/n, Mobile Hotspot, Bluetooth, GPS with A-GPS, USB Type-C, etc.
Warning: Technobuzz.net is not responsible for any damage that might happen to your phone during this process. You’ll lose all your data upon unlocking bootloader.
How to Install TWRP and Root Redmi Note 8
So without wasting the time, let’s start the TWRP and Root Guide for Redmi Note 8. Read all the steps very carefully and follow all the steps one by one on your PC and redmi Note 8. Before we begin, we highly recommend you to create backups of your data and files.
Requirements to Install TWRP and Root
- Make sure its battery is at least 60%.
- Orginal USB data cable to coonect your phone with PC
- A Windows-based computer. To run some fastboot commands.
- ADB Fastboot Drivers and Android Platform Tools.
- Magisk Root package (zip). Download the latest version available.
- Unlock bootloader of the phone
Download TWRP Recovery for Redmi Note 8.
Download the latest TWRP for Redmi Note from the below mention link and unzip the folder on your windows desktop. You need this file to flash the TWRP on your phone.
Download TWRP For Redmi Note 8 Here
Install TWRP Recovery on Redmi Note 8
1. Save the TWRP file on your Android Platform Tools. Make sure the ADB Fastboot Drivers are installed on your PC.
2. Now time to boot your phone in fastboot mode. To do this first switch off your phone and Hold volume down + power on at the same time.
3. Now your phone will boot in the fastboot mode. Connect your phone to the PC with USB cable.
4. Now open the command prompt window in the Platform ADB folder by Pressing Shift Button and Select Open Command Window Here.
5. Next, type following command lines and hit Enter on keyboard:
fastboot flash recovery recovery.img
6. Now TWRP is installed on your Redmi Note 8. To boot the phone in TWRP recovery, just press the Power and Volume Up buttons together. Your phone shall reboot into TWRP.
7. Voila! Now the Custom TWRP recovery is successfully installed on your Redmi Note 8. If you want to root the phone and then follow the below mention steps.
How to Fix Decryption Issue
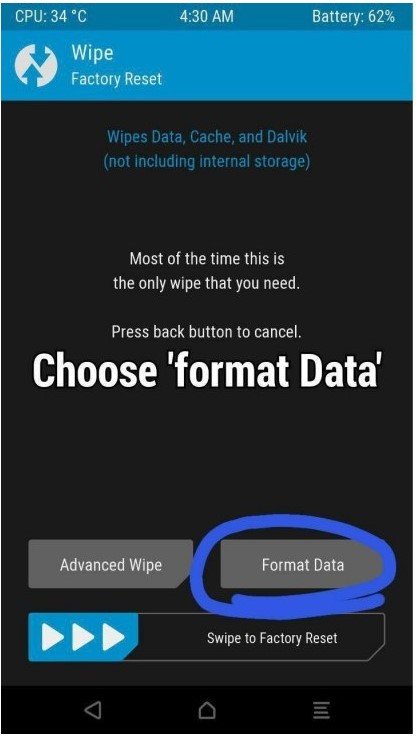
In some TWRP you will notice that the internal storage of the phone is not writable neither recognized. Don’t worry you can easily fix it. But this will delete all your data from the phone.
1. Just tap on the Wipe button of your TWRP.
2. Choose “Format Data” then type “Yes” to confirm. See the screenshot below.
How to Root Redmi Note 8
1. Download the latest version Magisk Root .zip file to your computer from the above mention links.
2. Now connect your phone to the PC and save the Magisk Zip file on your phone.
3. Boot your phone in TWRP mode, just press the Power and Volume Up buttons together. Your phone shall reboot into TWRP.
4. Once you are in the TWRP recovery. Tap on the “Install” Button and select Magisk zip file.
5. Now do the “Swipe to confirm flash” action.
6. Now the Magisk zip file will flash on your Redmi Note 8.
7. Finally, choose “Reboot” then choose “System“.
8. Enjoy! Now your Redmi Note 8 is rooted. You’ll notice a new app called Magisk Manager on your phone.
So this way you can install the custom TWRP recovery on the Redmi Note 8 and root the device too. If you are facing some trouble with this guide then leave the comments below and


