
After a long wait final the Samsung Galaxy S8/S8+ (Exynos) user can install the Android Oreo on Samsung Galaxy S8/S8+ android phones. Yes, the new OREO Firmware is released for the phone and many users already updated their phone with this new OREO update. This is the first stable release of Android 8.0 OREO for any Samsung devices and comes with lots of new features and improvements. Some of the new features on their OREO updater are picture-in-picture mode, notification channels, background app optimizations, notification snoozing, and more. The best part of this new update is that it comes with the latest February security patches.
A few Days back Samsung Galaxy Note8 receive the OREO update and now the Android Oreo on Samsung Galaxy S8/S8+ (Exynos). If you want to update your phone with this latest build, then follow the below mention guide and install Android Oreo on Samsung Galaxy S8/S8+ (Exynos) models. This tutorial will work on almost all Exynos Galaxy S8 and Galaxy S8+ devices except for Korean and Duos Exynos users.

How to Install Android Oreo on the Samsung Galaxy S8/S8+ (Exynos)
This method will work only on the Samsung Galaxy S8/S8+ Exynos Variant. Don’t try this on any other device. Follow the steps correctly otherwise you may brick your device. And make sure that your phone battery is above 70% and do take the full backup of your phone.
Download Samsung Galaxy S8/S8+ Android Oreo Firmware
- G950F model users download these files: AQL5 Odin and AQL5 to CRAP.
- G955F model users download these files: AQL5 Odin, AQL5 to ZRA5, and ZRA5 to CRAP.
Steps to flash Android Oreo on Samsung Galaxy S8/S8+
1. Download the ODIN zip file here to flash the firmware on your phone.
2. Now download the AQL5 ODIN file for your model from the above mention links and unzip the folder on your desktop.
3. Now its time to boot your phone in download mode. To do this power off your device then hold the Bixby button + Volume down + power.
4. Once your phone in download mode. Connect to the PC with USB cable and run the ODIN exe file the same files that you downloaded in step 1.
5. Click the BL button and navigate to your Odin firmware folder where you extracted your files, and then click the file starting with BL. Do the same for AP, CP, and HOME_CSC.
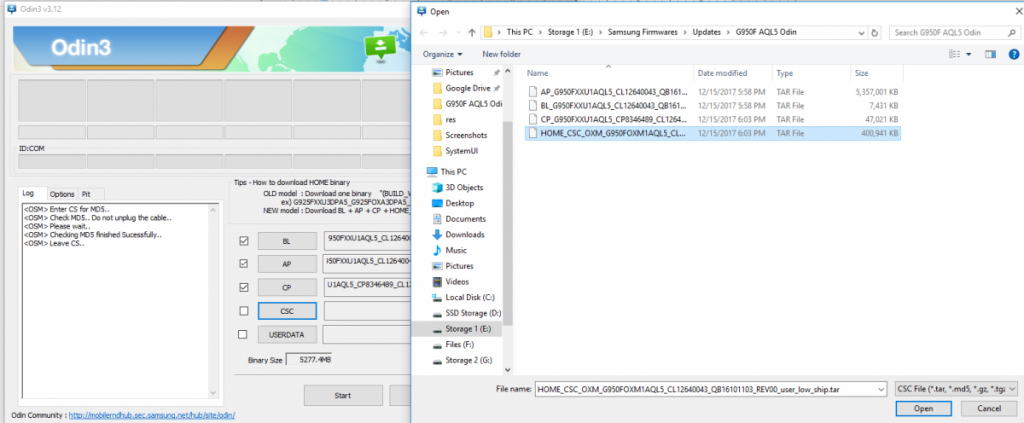
6. Now hit the start button to start the flashing process.
7. Once the software version is flashed successfully on your phone, your phone will reboot.
Part 2- Flash OREO OTA Update
Method 1 With Phones SD Card
1. Once the phone is booted. Save the OTA zip file in your phones SD card.
2. Now boot your phone in recovery mode. First turn off your phone and hold down the Bixby button + Volume up + power.
3. Once your phone in Recovery mode. Select “apply update from SD card.” You can select this by using your volume rockers to navigate and the power button to select.
4. After selecting that option, find the file called “update.zip” and select it with the power button.
Now the OTA update will flash on your phone.
Method 2 Flash With ADB Commands
If you don’t have the SD card on your phone, then use this method. Here you need a Windows PC and ADB drivers.
1. Install and Setup the ADB drivers in your PC. Now you will see the ADB folder on your Windows C Drive.
2. Now Save the OTA update zip file in the ADB folder.
3. Now boot your phone in recovery mode. First turn off your phone and hold down the Bixby button + Volume up + power.
4. From here select “apply update from ADB” and then connect your phone to the PC with USB cable.
5. Now go to the ADB folder and in the address bar of ADB folder type CMD to open the commands prompt windows on ADB folder.
6. Now enter the following command to Install Android Oreo on Samsung Galaxy S8/S8+
adb sideload File_name.zip
The file name is the name of ZIP file that you saved in the ADB folder.
7. Now the flashing process will start on your phone, and this will take some time to install Android Oreo on Samsung Galaxy S8/S8+.
And that’s it! Now your Exynos Galaxy S8/S8+ models should be running the official release of Android Oreo! If you have any doubts or facing some problem, then leave the comments below, and we will help you to fix it up.
Via – XDA