
Yes Android 5.0 Lollipop official firmware is now available for the Nexus 4 user and you can update you phone with this new official release and enjoy the benefit of your Android 5 on your Nexus 4 android smartphone. The new firmware comes with lots of new improvement and battery life. If you are the Nexus 4 users and looking for the manual way to update you device with the latest firmware, here is the proper guide which you can follow on your device and instal the same in some simple steps. The process is very simple and all you need the official image file and some ADB files to update you phone. The Nexus 4 Android 5.0 Lollipop firmware build is LRX21T, download and install using the instructions given below.
Before following this guide do take the full backup of your phone and read all the instruction very carefully. Your device internal storage will be completely wiped so make sure you backup any/all of your important files on a PC.

Update Nexus 4 With Android 5.0
Step 1. Install the Nexus 4 drivers on your Windows PC here.
Step 2. Unlock the bootloader of your device first, if already done that then read the next step.
Step 3. Now download the Fastboot and ADB files here and extract the folder on your desktop.
Step 4. Download Nexus 4 Android 5.0 Lollipop factory Image here and extract the folder on your desktop. you’ll get a few files:
A radio and bootloader image
flash-all.bat
flash-all.sh
flash-base.sh
image-****-lrx21t.zip
Step 5. Now copy all these files and paste into the ADB folder that you extracted in Step 3.
Step 6. Now enable the USB debugging mode on your Nexus device. On your phone or tablet, head to Settings, and scroll down to About phone at the bottom. Scroll down to Build number and tap it 7 times. This unhides the developer options, which aren’t displayed in Android 4.2 and later. In the Developer options menu, enable USB debugging.
Step 7. Now connect your device to the PC with USB cable.
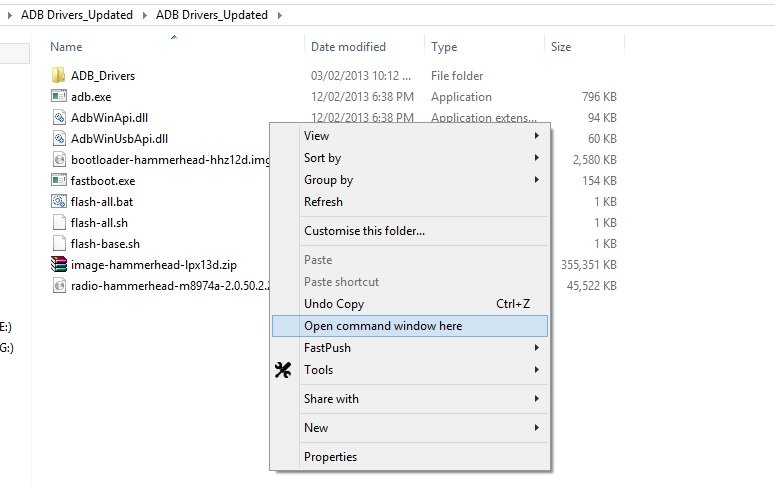
Step 8. Now open a command prompt window on the ADB folder. Hold Shift button and Right click on the White space of the folder and click on “Open Command Window here”.
Step 9. Now enter the following command on the windows:
fastboot devices
This command will list the connected devices. If your phones serial number shows up you are good to go and may continue. If the phone is NOT listed this indicates that your drivers are not installed correctly.
Step10. Now run the following command to boot your device in fastboot mode.
adb reboot bootloader
Step 11. Now your device is in Fastboot mode. Now go to the ADB folder and click on the “flash-all” file to start the installation process.
Step 12. Now the process will begin. You will see alternating downloading… writing…. erasing… on your device’s screen.

Step 13. Once the process is completed you phone will reboot and this time you can disconnect you phone from the PC.
Now your nexus 4 android smartphone is running on the Android 5.0 Lollipop. Enjoy!