Few days back we posted a tutorial how to update Nexus 9 with Android 5.1.1 android lollipop update, if you recently updated your device with the updated firmware and looking for a way to get root access on your phone. Here in this article you will get all your answers like how to root, unlock bootloader and how to flash TWRP recovery on Nexus 9. With rooting, you do lots of thing on your android like install custom ROMS, Remove system apps, Install any tweaks and mods. In this tutorial, we’ll use the Nexus Root toolkit, which allows you to unlock and root your device in a few clicks, or flash it back to stock and re-lock it. Yes, all these things are possible with this one toolkit. And yes we tested the same on our most of the Nexus device and the tools work perfectly without any problem.
The tool is just too simple and you don’t need to learn rocket science to use it but anyhow follow the below process to root your Nexus device. Before following this guide, do take the full backup of your Nexus 9

How To Use Nexus Root Tool Kit to Unlock, Root & Flash Recovery
Step 1. Visit this page and download the Nexus Root Toolkit Exe file on your desktop.
Step 2. Now run the exe file on your desktop and this will install the application on your windows PC.
Step 3. Now connect your Nexus 9 to the PC with USB cable and run installed application on your PC.
Step 4. Configure your drivers if you haven’t already using the driver guide. Or read our article here how to instal Nexus 9 drivers.
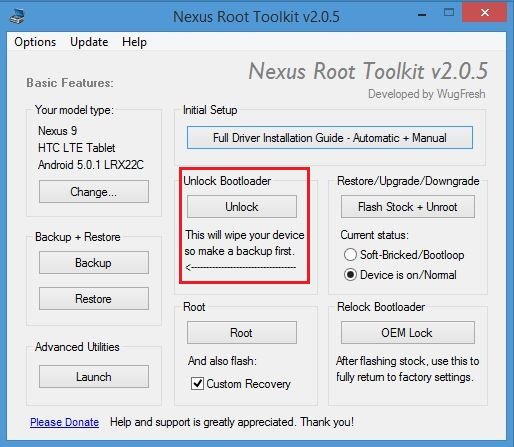
Step 5. If your phone has the locked bootloader, then first you have to unlock it. Without unlocking it, you can’t root your phone and not even flash the TWRP recovery.
To do this hit the Unlock button from the toolkit and wait for the few minutes to complete the task.

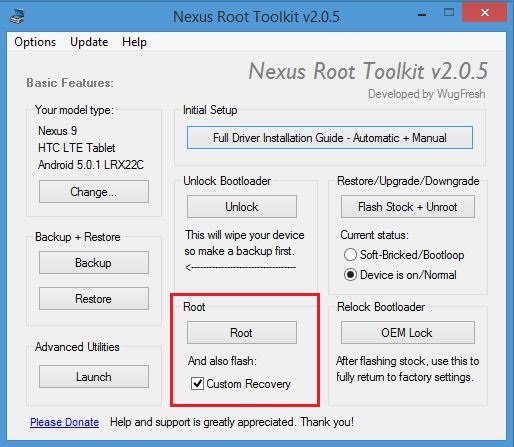
Step 6. To root your device and install the recovery. Hit on the Root button and select the option Custom Recovery. And wait for few minutes to see the magic 🙂

Enjoy! ^_^ Now you Nexus 9 is rooted with custom Recovery. Share if you found any issues with the tool in the comments section below.
