Want to upgrade your Windows PC Hard drive without reinstalling the OS and other applications? The best and simple method is to take the full backup of all your application and data, after that install the new upgraded Hard drive on your PC and install the Windows OS again, application one by one and install the required drivers again. But this process will take so much time, which can be frustrating. But today in this guide we let you know how you can easily upgrade your Windows PC hard drive without reinstalling the OS, drivers and applications. With this method you can save lots of time and even makes it easier and easily upgrade your hard drive.
To do this all you need a Upgraded hard drive and a application called AOMEI Backupper, which can clone hard drives irrespective of the sizes. With the help of this application you can clone your old hard drive into new hard drive. The best thing of the application is that it is free to use and does not need any serial key or registration. You can find the download link of the application at the end of this post.
Read Also: 7 Ways to Speed Up Your Computer
Read Also: Clean Junk Files on PC and Speed Up the Performance
First thing you have to do is connect the new Hard drive with your PC and install the application on your Windows PC. Once the new hard drive is connected with your PC, run the application from your desktop. After that follow the below instruction one by one.
Step 1. From the AOMEI Backupper main screen select the option “Clone” and after that hit the “Disk Clone”. With this feature you can directly copy one hard drive to another without creating an image file. Not only this you can also resize and create partition on the new hard drive with this application.

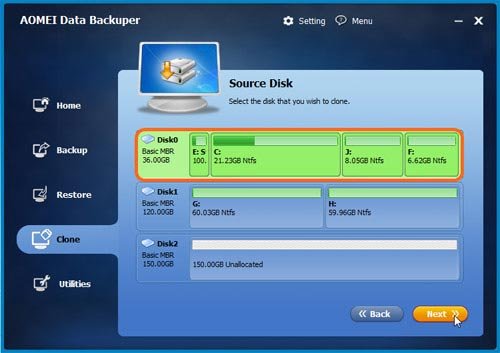
Step 2. After this you can see both the hard drive on the next screen (Your Old Drive and New Drive) No from this screen select the Old disk which had all your data and windows OS.

Step 3. Now form the next screen you have to select the destination disk (New Upgraded drive), and then click “Next” to start the clone process.

Step 4. From this screen you can use the option to resize the partition of your new Drive. With editing Partition feature you can control over how much space you want in you new Hard drive to install OS. Once all the settings are saved, click “OK”. On the next screen that appears, hit the “Start Clone” button. Now this will start the cloning process of your Old drive.

Now the process will take some time to copy all your system file, partition, and application. It depend on the Memory and speed of your Windows PC. During this process don’t run any application on your desktop or open any web page, this will cause some problem on your cloning process. So wait for some time to finish the process.
Once the process is complete, you can disconnect all wires, disconnect the older primary hard drive and replace it with the newer upgraded one drive one. Now restart you PC and you can see all your application and file on the same place. With this way you can save lots of time and helps you to upgraded your Windows PC hard drive easily. The Application works fine on all PCs running Windows XP or higher.
