Android Nougat 7.0 update for Nexus phones are officially released. Many Nexus users who recently updated their phone with the latest Nougat version and looking for a guide to install the TWRP recovery on Android 7.0 Nougat. As you know, all of the Android phones come with the stock recovery which has some limited features, and you are not able to do lots fo tasks like full system backup, Install zip files, DLash Custom ROMS, etc. To install custom ROMs and root Android 7.0 phone you need a TWRP custom Recovery.
To install TWRP recovery on any android phone, you have to unlock the bootloader of the phone first and install the TWRP recovery with some fastboot commands. The guide is pretty simple and all it takes around 5 to 10 minutes to flash the recovery file on your Android 7.0 Nougat devices. Here in this tutorial, we provide you all the details about the flashing the TWRP recovery.
Before following the tutorial do take the full backup of your device and save the backup on your PC or your cloud. Warning: Technobuzz.net is not responsible for any damage that might happen to your phone during this process. So let’s get started.

See Also: How to Install Android 7.0 Nougat on Your Android Right Now
Install TWRP recovery on Android 7.0 Nougat
As we already mention above to get started you need to unlock the bootloader. And you need two files on your PC. First one is the ADB and fastboot files to run some fastboot commands and the second one is the latest TWRP recovery image file.
Download ADB and fastboot files
ADB and fastboot file will help you to connect your Android phone to the PC, and this will help you run the fastboot command on your Android phone. Below is the link of the ADB/Fastboot zip file, unzip the folder and run the Exe file on your PC. After the installation, you will see the ADB folder on your PC (C:/ADB).
Download ADB/Fastboot Zip file here.
Download TWRP for Android 7.0
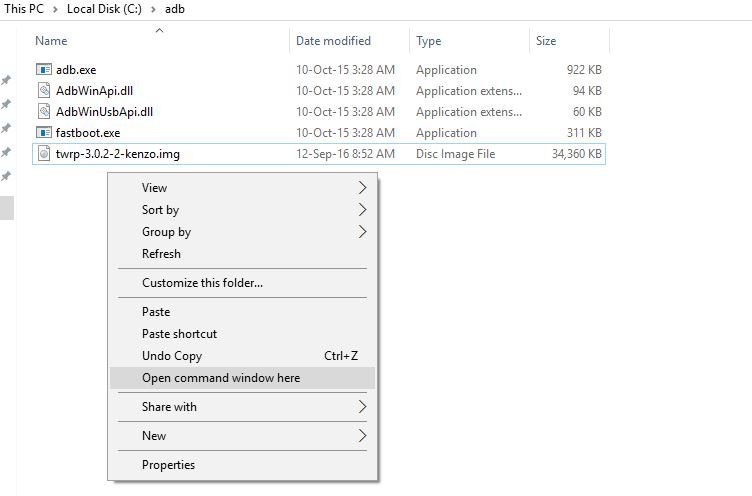
Visit this TWRP page and search your device in which you flash the Custom Recovery. Download the latest version of TWRP and save that file to your ADB folder, the same folder which you created during the installation of ADB/Fastboot files.
Flash TWRP recovery
1. Open the ADB folder on your PC in which you saved the TWRP file. Hold the Shift button and right-click on the space of the folder and select “Open Command Prompt Window.”

2. Now connect your phone to the PC with USB cable and enter the following command to boot your phone into Fastboot mode:-
adb reboot bootloader
3. Now your phone will boot in fastboot mode, and you will see the fastboot written on your mobile screen.
4. Once your phone is in fastboot mode, run the following command to flash the recovery.
fastboot flash recovery [recovery file name]
In our case, we are using this command. Our recovery file name is twrp-3.0.2-2-kenzo.img
fastboot flash recovery twrp-3.0.2-2-kenzo.img
5. Now within a second this will flash the TWRP recovery on your phone.
6. Now enter this command to reboot your phone.
fastboot reboot
HOW TO Install TWRP on ANY ANDROID Phone [2018 GUIDE]
Now the TWRP custom recovery is successfully installed on your Android 7.0 Nougat phone. Happy Androiding!

exccellent text & thank you.
now would you be kind enaugh how to tell me, how can i find the “twrp” for
my Huawei Nova Can-L11.
I need to know it because i want to root my device.
Thnank you.
doesn’t work, third day, how many twrp version i need for huwei p9 lite working a the moment under windows 7
There is no TWRP for intex Staari 10 device…
Please I want to download TWRP for My device…